This page provides a step by step process to implementing ReST with your client. We assume you will work through these steps with the Clinician Manual which can be downloaded from the Resources tab.
Feel free to work through systematically or to pick and choose components that you need more information on. Come back to this page as often as you need to and we will add more information as people gives us feedback about what is useful.
To help you consider whether you and your client are suited for ReST we have provided a readiness checklist, a parent information handout and a self assessment for you to complete.
STEP 1: Sustainability – Client and Clinician
These are tools to help you decide whether ReST is the best treatment for a particular child. None of the tools will make the decision for you – your clinical judgement is required to weigh up the pros and cons of providing ReST therapy on each occasion.
STEP 2: Concepts
Three main concepts are used in ReST therapy: Sounds, Beats and Smoothness.
Each of these concepts is demonstrated in the videos below and described in the Clinician Manual. Children are taught to use each concept simultaneously in the Training (Prepractice) phase of ReST. In the Practice phase, judgements of correct and incorrect are made on the child’s success at using all three components of speech simultaneously.
If you would like more examples of each concept have a look at the videos on the client driven learning page.
Sounds
Donna teaches Byron the idea of getting all his sounds right.
Sounds refers to the accuracy of the phonemes produced in the child’s speech. To teach sounds you use the cues and techniques that you use in other speech therapy. Some children will need phonological cues, some will need articulation cues and others will need to learn the difference between nasal and not nasal speech so that the resonance component of Sounds is correct.
Most speech pathologsists will already have a range of techniques and strategies to teach production of individual sounds and sound sequences. Feel free to bring all your “bag of tricks” to this concept.
BEATS
Tricia teaches Lachlan the concept of beats.
Beats represents the rhythm of stressed and unstressed syllables in a word. Many children with CAS have difficulty with this concept and this can be seen in omitting weak syllables, using equal stress on all syllables or vowel distortions where shorter vowels are lengthened.
To make a syllable stressed we make it longer, louder or higher pitched. Any one of these changes is enough to make a syllable stressed. To make a weak, or unstressed syllable, we do the opposite, we make it shorter, softer or lower pitched.
In ReST therapy, we generally start with stressed syllables and the parameter longer as it is the easiest concept to teach and visually accessible. In our early research (Ballard et al., 2010) we showed that some children with CAS will experiment with the three parameters of length (duration), volume (intensity) and frequency (pitch) and settle on the parameter that they are most successful in modifying.
Teaching Beats may require teaching the concepts of long-short; loud-soft or high-low although children can acquire accurate beats without understanding the concepts explicitly.
Use metaphor, visual supports, modelling and demonstrations to teach Beats. Some examples are talking about things that are long and short, showing long and short blocks or lines on paper, or printing the nonsense words stressed syllables large and the unstressed syllables small. More ideas can be found in the Clinician Manual.
SMOOTHNESS
Tricia teaches Lachlan the concept of smoothness.
Smooth is the word we use in ReST to describe fluent speech. Children with CAS may have syllable segregation where syllables within words are separated from each other inappropriately. Hesitations and restarts are also errors of smoothness that you may see in children with CAS.
Most clinicians can readily identify hesitations and restarts however some clinicians have more difficulty with identification of syllable segregation. We are working on additional training to help you with this skill. In the meantime, it is worth knowing that we always advise, if you are unsure whether there was an error, you should judge a production as incorrect. This is what we have done throughout the research and although it leads to the child receiving less praise, it appears to be effective and consistent as a decision making guide.
When teaching Smooth you can use pictures, metaphors, modelling and demonstrations. Some examples include links in a chain, dolls or children holding hands, a train and train carriages being joined together. Demonstration may include using blocks which are placed together or separated by a gap (this is seen in some of the video). More ideas are in the Clinician Manual.
Nonsense words
ReST treatment uses nonsense words as the treatment stimuli. We do this for a number of reasons.
- The child will not have an existing motor plan for the words.
- The words can be made specifically for THIS child.
- The linguistic system (except phonology) is not required to activate and neither does it interfere with the production of the word.
- In the first few sessions, each nonsense word is a brand new concept to the child and therefore requires them to use their speech motor system to make a new plan and/or program.
In all our research, practicing nonsense words has resulted in improved production of real words.
More information about nonsense words can be found in the Clinician Manual.
Session plan (times approximate)
| 0-5 min | Welcome, overview |
| 5-15 | Training Phase |
| 2 minute game | |
| 17-55 | Practice Phase |
| 20 attempts at nonsense words | |
| 2 minute game | |
| (repeat till end of the session) | |
| 55-60 | Leave taking |
Session Components
Each ReST session is made of two main sections or phases.
- The first phase is called the Training Phase (or Prepractice in our Research papers).
- The second phase is called the Practice Phase (still called Practice in our Research papers).
These are distinct sections of the session and after the first 1-2 sessions the Training Phase should be much shorter than the Practice Phase.
Training Phase
In this first section of the session, the clinician teaches the child about the concepts Sounds, Beats and Smoothness and the idea that words need all three features to be correct. Speech Pathologists can use almost all their clinical cues and strategies in this phase and most clinicians find it reasonably easy to do. In the video above, the examples of teaching Sounds, Beats and Smoothness all come from the Training Phase of therapy.
In the first 1-2 sessions, the training phase may be up to half the session but you should aim to reduce this from session 3 to no more than 10 minutes.
Also, in the first 1-2 sessions, you need to teach the individual concepts and teach the child how to combine the concepts so that their production matches yours. In later sessions, you should use the data from the previous session to identify what they found difficult and focus the Training Phase on the child’s errors from previous days.
Practice Phase
This is the most important part of therapy and the one that we believe differs from standard Speech Pathology practices. In the Practice Phase, the clinician does NO teaching and provides feedback only on the overall accuracy of the child’s attempts.
Overall number of attempts is a really important part of ReST. Each Practice Phase you should be aiming to have the child make 100 attempts to exactly copy the model of the nonsense word. In the early sessions this may not be possible and you should save the incomplete attempts for the end of future therapy sessions. In this way you will ensure that the child gets the same amount of treatment (1200 attempts) children in the research did.
More details about both phases are included below and in the Clinician Manual.
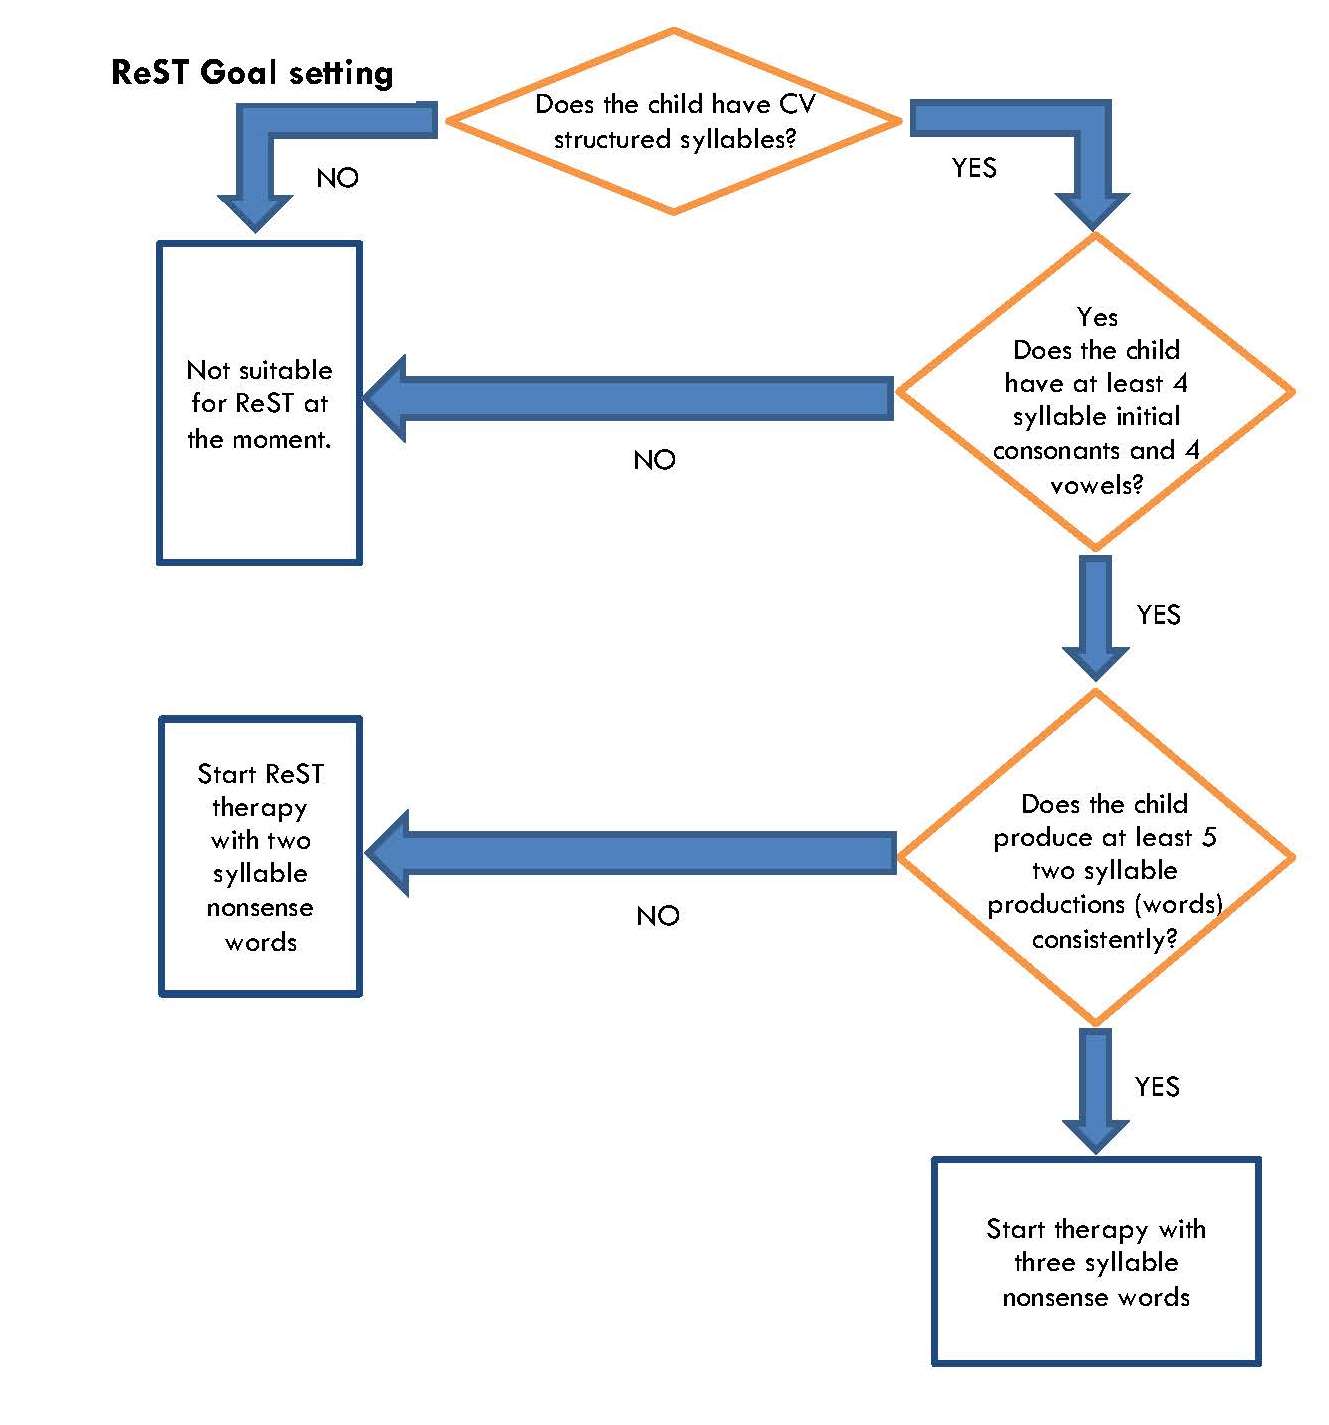
STEP 3: Goal Setting and Session Planning
Use this flow chart to work out where to start therapy.
STEP 4: Prepare for therapy
It is important to prepare your treatment materials in advance, There are several steps to this.
Treatment Stimuli
1. Choose the sounds for treatment
For each child you need to choose 4 consonants and 4 vowels that will be made into nonsense words. The vowels can be three long vowels and schwa OR two long vowels, a short vowel and schwa. In either case, strong syllables are only made with the long vowels. Rules for how to choose these phonemes are contained in the Clinician Manual.
2. Establish your therapy nonsense words.
You will need 20 nonsense words for each child. You should use the same words for all 12 sessions but in a different order each day. If you do a second block of therapy, we recommend you reassess and make a new set of words.
There are three ways to do this:
- You can use an existing set of words (see the Resources page).
- You can modify an existing set of words
- You can create new nonsense words by hand.
If you modify a word list or create one by hand we would be delighted if you send us the file so we can share it with other clinicians on the resources page. A speechies-pay-it-forward opportunity.
Regardless of which method you choose, you need to create 20 words that you use every session for 12 sessions.
If you are working at the three syllable level then 10 of these words will take the lexical stress pattern of STRONG-weak-weak and 10 of the words will be weak-STRONG-weak.
If you are working at the two syllable level then 10 of these words will take the lexical stress pattern of STRONG-weak and 10 of the words will be weak-STRONG.
Many children find the weak onset words harder than the strong onset words but they need to practice each equally so we randomly sort the 20 for each block of the Practice Phase. You can work on whichever of the nonsense words you think is beneficial in the Training Phase of the session.
3. Prepare your therapy materials.
You will need materials to:
- Teach your nonsense words and the three core concepts of sounds, beats and smoothness.
- Present the nonsense words to the child in a pre-set order. You can do this with cards or a PowerPoint display.
You will also need things that will allow you to be flexible and effective in therapy – pens and paper, a visual timetable, a set of tokens for counting off attempts and reinforcing child behaviour and games to play between blocks of drill.
STEP 5: Do therapy – Training Phase
Pippa and Mira are in the Training phase.
They are working together to get the best possible production. Pippa is giving feedback about how Mira has said her nonsense words on each of Mira’s attempts.
Training Phase teaching and feedback tips
In the training phase you can use whatever cues and strategies will work with the particular child. Of course, these should vary with the age of the child.
It is important to note that the idea of the Training Phase is for the child to develop a “minimal internal reference of correctness”. This means that they need to understand what is required of them but they do not need a high degree of success in this phase initially.
Make sure you give feedback on nearly every attempt the child makes. In this phase we are focused on Knowledge of Performance feedback which you also might know as detailed and specific feedback.
In this phase of the session, you might like to teach a single component at a time. You may then like to teach two components together before asking the child to try accurately using all three concepts in the one nonsense word.
More ideas about the training phase can be found in the Clinician Manual.
STEP 6: Do therapy – Practice Phase
Donna and Byron are doing practice.
Note that Donna is only giving knowledge of results feedback and only on some of Byron’s attempts.
Practice Phase
The Practice Phase is essentially drill practice with reduced clinician feedback.
The clinician says the target nonsense word, the child copies it. If the child copies the adult model exactly, including matching the prosody, then the child is recorded as making a correct production. Any differences between the child’s production and the adult model are counted as incorrect. If the clinician is unsure, an incorrect attempt is recorded.
Some children in this phase will be able to produce the sounds correctly but not beats and smoothness. When they start to focus on beats, the sounds aspect may temporarily be less accurate. Encouragement in the Practice Phase and focusing on this in the subsequent Training Phases will help the child overcome this issue.
After 20 randomly presented nonsense words, the child gets to choose a 2 minute game and then the drill sequence starts again.
Feedback in the Practice Phase
It is important that the child learns to self-evaluate their productions. We do this by giving feedback on only 50% of attempts of the 100 total, each session. In the research we did this by giving feedback on 90% of attempts in the first block of drill and gradually reducing how much feedback we gave on each subsequent block of drill in the session.
The nature of the feedback changes in this Phase as well. Here we are giving Knowledge of Results Feedback. Knowledge of Results is based on a decision of whether the production exactly matched the adult model or not. Once the decision is made, the clinician tells the child whether their attempt was correct or incorrect.
For example, “not that time” or “great, you did it”.
More information about the Practice Phase can be found in the clinician manual.
STEP 7: Putting it all together
This flow chart will help you move up and down your goal hierarchy.
Don’t forget to use the Clinician Manual for more details about all aspects of ReST. We would love to hear feedback from you via the contact page.
Good luck!
If you have any questions, please contact us.